Importing a bank statement is the quickest way to get a month of transactions into Clubtreasurer. The import itself has never been the slow part — the slow part is the stage straight afterwards, where you work down the draft rows deciding what each one actually is.
One line covers two different things and needs splitting. Another is a transfer between your own accounts, not income at all. A third looks like a duplicate but isn’t. Sorting that out has meant scrolling sideways through a wide table, hunting for the right column, and losing your place halfway down.
We’ve rebuilt that stage. Everything you can do to an imported row now sits in one place, splitting a row is far more flexible, and working through a long statement no longer means keeping track in your head.
Every row has its own Actions menu
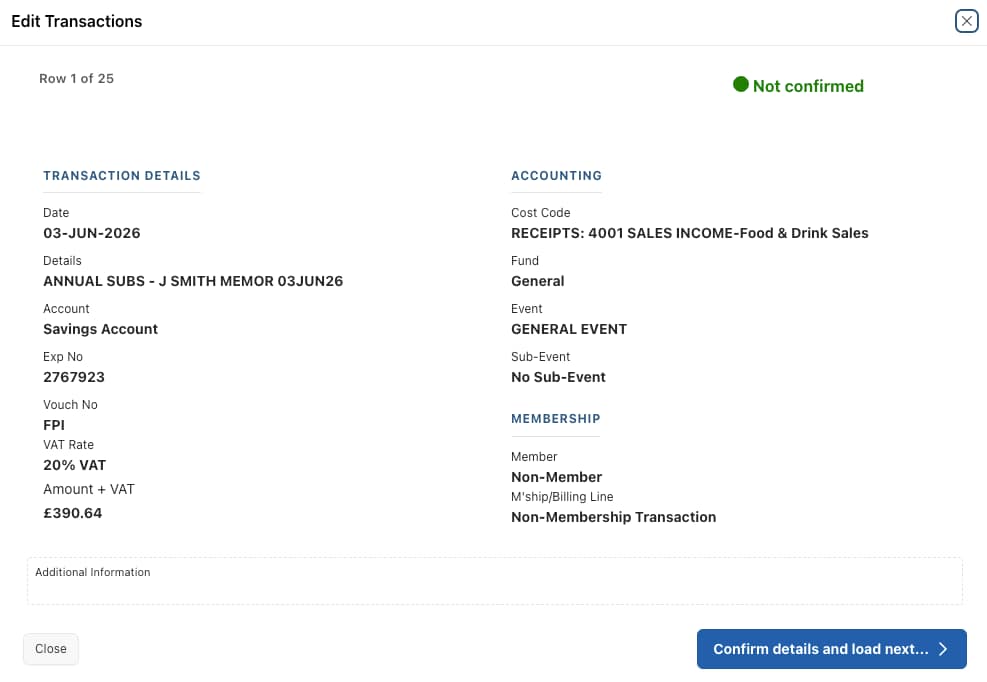
Each draft row now carries a gear icon. Click it and you get the options that apply to that particular row:
- Edit Transaction — opens the row in a pop-up showing every column on one page, instead of scrolling sideways through the table
- Split Row — divides one imported line into two or more transactions
- Convert to Transfer — switches a row between an ordinary receipt or payment and an account transfer pair
- Confirm Transaction Details — marks a row as checked when it’s already correct
- Clear Duplicate status and Force as new Receipt/Payment — override the duplicate and existing-batch warnings on a single row
The menu only offers what genuinely applies to the row you clicked, so you won’t pick something that quietly does nothing. A transfer, for example, can’t also be split.
Work through an import row by row
Choose Edit Transaction and you can review a whole import one row at a time. Save your changes and the next unconfirmed row opens automatically, with a counter showing how many are left to check.
Confirmed rows are ticked and highlighted in the table, so you can always see how far you’ve got. When the last one is done the window closes on its own.
You don’t have to confirm every row to finish an import — it’s simply a checklist for keeping your place in a long batch.
Splitting is much more flexible
A single statement line often covers more than one thing: part venue hire and part catering, or subscriptions from three different members arriving as one payment.
The Split Row dialogue now takes as many lines as you need in one go. Enter an amount, press Enter, add another — a running summary shows what you’ve allocated and what’s left on the original row, so you can see at a glance when it balances.
The new rows are created as copies of the original, so you only change the Cost Code — or whatever else differs. They’re added to the same Receipt/Payment batch, so they stay together in your accounts.

Simplified VAT handling
If your organisation has VAT Accounting enabled, imported amounts are now treated as gross throughout — the figure exactly as it appears on your bank statement.
Change a row’s Cost Code and it picks up that code’s VAT treatment straight away, with the Net and VAT figures following automatically. Split rows work the same way: enter the gross amount for each line and the rest is worked out from the Cost Code you give it.
Easier to see what needs attention
The draft table uses colour more consistently. Rows you’ve edited or confirmed are highlighted, transfers and batch additions have their own shades, and a row missing an Account or Cost Code now highlights just that cell in red — so you can see what needs filling in without reading along the row.
Prior-year and possible-duplicate rows are greyed to show they won’t be imported as things stand. Hover over any status icon for an explanation.
Creating your draft transactions is quicker too: the rows now appear in place rather than reloading the whole page, with a progress indicator while cost code and member matching runs.
Where to find it
Head to Receipts & Payments > Import Transactions and run an import as you normally would. The new options appear at Step 3: Review & Edit Draft Transactions.
There’s nothing to switch on and nothing to learn first — your next import will simply have them.
New to importing transactions?
The Importing Transactions guide walks through the whole process from bank statement to posted accounts. Not a Clubtreasurer customer? Create a free trial account at Clubtreasurer.com