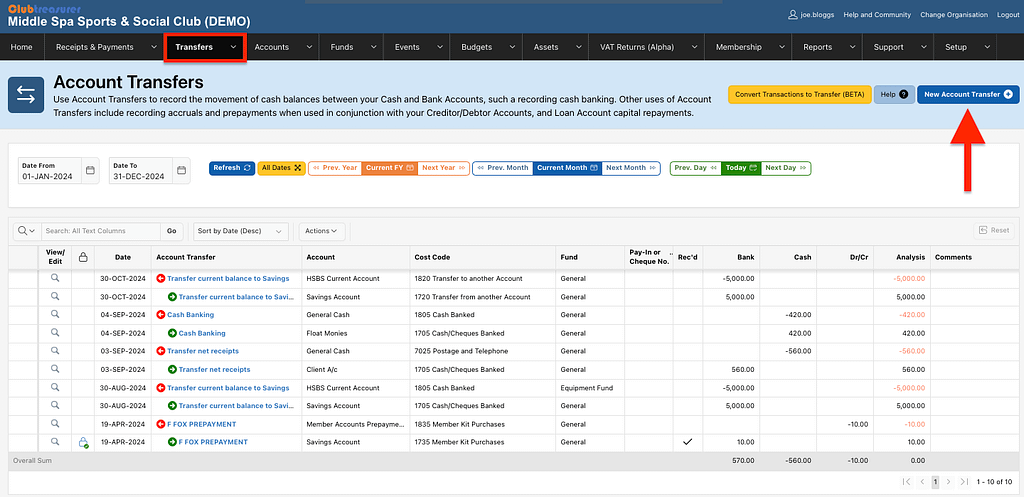
Use Account Transfers to record the physical movement of cash balances between your Cash and Bank Accounts, such a recording cash banking. Other uses of Account Transfers include recording accruals and prepayments when used in conjunction with your Creditor/Debtor Accounts; and loan account capital repayments.
Importantly, Account Transfer transactions are not treated as income or expenditure and will not appear your Profit & Loss / Income Statements.
How to Create an Account Transfer
Navigate to Transfers > Account Transfers.
The Account Transfers page lists your existing Account Transfers. Use the date buttons, filters and search box to find your transfers to view and/or edit.
To create a new Account Transfer click the New Account Transfer button:
Step 1:
Create a Manual Transfer
The easiest way to create an Account Transfer is to create a Manual Transfer:
- Select Transfer From Account
- Click Create a Manual Transfer button and go to Se

Option: Create a Transfer using Available Cash Receipts/Transfers
An alternative way to create an Account Transfer is to link it to one or more Net Receipts* or other Account Transfer receipts. For example, when doing your cash banking you can select all Receipts recorded against your Cash Account and create a single transfer to your Bank Account. This gives you more control of your cash transactions by locking them to prevent them from being edited later, and avoiding the possibility of accidentally editing or deleting them after they have been transferred to another account. This ensures that Net Receipts / Transfers are always reconciled to their corresponding Transfers.
*Net Receipts are Receipt and Payment batches with one or more transactions that have an overall net Receipt. ie. the batch can contain both receipts and payments but the batch total must be an overall receipt.
- Select Transfer From Account: here, we’ve selected a Cash account and the system displays net cash Receipts and Transfers that can be selected to create your Account Transfer.

- Select Available New Receipts to include in your Transfer
- Click Continue…. button

How to hide available Receipts.
- If you always use the manual Transfer method or just want to tidy up the available Receipts view, you can remove or hide selected Receipts .
- To do this, select the Receipts you want to hide and click the “Mark as Unavailable for Transfer” button.
- This will move these Receipts into the “Receipts marked as Unavailable for Transfer” region below. (To show contents of this region click the small arrow icon to the left of the title)
- Finally, you can restore Receipts lines and make them available for transfer by selecting them from this region and clicking the “Restore Selected Receipts” button.
Step 2:
In the next screen we enter the remaining details required to create the Account Transfer.

Account Transfer Details
- Enter Account Transfer Details in this box:

- Transfer Details: Enter brief details/description for this transfer.
- Transfer Date: Enter or select the transfer date
- Show Funds? (optional): Check box if you want to record the Account Transfer across specific Funds at the same time. This is an advanced feature for organisations such as charities that need to account for monies held in Funds as well as Accounts. If left unchecked, the Account Transfer will use your General Fund.
- Show Members (optional): Check box if you want to record the Transfer In line(s) as a Membership receipt.
Transfer Out
- Enter Transfer Out details in this box:

- Account: This is the Account you are transferring monies FROM which you selected in the previous page. If you used the optional Step 2 then you will need to click the “Previous” button to go back to the previous page
- Cost Code: Select an appropriate Cost Code. The available Cost Codes in the list are restricted to ‘Asset’ types that will only appear on your Statement of Assets and Liability (‘SOAL’) and/or Balance Sheet Reports. Importantly, Account Transfer transactions do not create income or expenditure transactions and therefore do not appear in your Profit & Loss or Income Statement Reports.
Cost Codes and Client Accounts: The one exception to this rule is if one side of the Transfer is to/from a Client Account when you are able to select a Receipt/Payment Cost Codes for one or both sides of the transfer. Client Accounts are a special Account Type used to track and manage client monies, and it is common for organisations such as Accountancy firms to manage their clients’ accounts on their behalf and often need to receive management fee income directly from the Client Account(s). This can be recorded as an Account Transfer as follows:
| Transaction | Account | Cost Code | Amount | Comments |
|---|---|---|---|---|
| Transfer Out | Client Account | 1820 Transfer to Another Account “Asset” (Balance Sheet transaction) | <-£ 50.00> | This side records the transfers of monies from the Client Account |
| Transfer In | Current Account | 4020 Professional Services Income “Receipt” (P&L Transaction) | £ 50.00 | This side records the receipt of monies as an income (“Receipt”) into your own bank account. This will appear in your P&L Report |
- Fund: If the Show Funds? box was clicked, you can also select a Fund to transfer the cash amount from.
- This is useful if you also need to record and synchronize the cash movement between Funds at the same time as the Account Transfer.
- Caveat: if you just need to record a Funds transfer without the physical movement of cash, you should create a Fund Transfer transaction, instead.
- Total Trnf Amt: This is the total transfer amount you will transfer between accounts.
- Note that this value is pre-populated and cannot be changed if you have selected associated Receipt Lines with this transfer.
- Payment No (optional): Enter a Cheque or Payment number or select one of the “Quick Picks” (eg. “CASH”)
Transfer In Line(s)
- Enter Transfer In Lines in this box

- Transfer In Details: Leave this blank to copy from the Transfer Details box or you can enter different details for this line. This is useful if you want to differentiate multiple Transfer In Lines in your batch.
- Account: This is the Account you are transferring monies TO
- Cost Code: Select an appropriate Cost Code. (See Transfer Out for more details)
- Fund (optional): If the Show Funds? box was clicked, you can also select a Fund to transfer the cash amount to
- Member (optional): if the Show Member? box was clicked, you can now select a member and record the Transfer In line as a member receipt.
- M’Ship Billing Line (optional): if the Show Member? box was clicked select an appropriate Membership Billing Line. You can also selected Unallocated Membership Receipt or Non-Membership Transaction.
- Line Amount: The system will copy the Total Transfer Amount into this box. If you are entering multiple transfer-in lines in this Transfer, change this to the correct amount for this line.
- Important: When entering multiple Transfer In lines, the total Transfer In balance MUST match the Total Transfer Out Amt balance. The system will warn you if there is a mis-balance.
- Pay-In No (optional): Enter your own Payment Voucher number. Eg. your bank paying-in slip. Or select one of the Quick Picks (eg. “Cash”)
- Notes (optional): Enter notes for this transfer line.
Save your Transfer
- Click Save button to save your Transfer.

Account Transfer Balance Warning
If your Account Transfer batch does not balance (ie. Transfer Out and total Transfer In line(s) amounts are not equal) the system will display a warning message instructing you to correct your entries or add additional Transfer In line(s) – See below

Adding Additional Transfer Lines
If required, you can add additional Transfer In lines to the Account Transfer. This allows you to record a “one to many” transfer from a single Account to two or more Accounts.
- To add additional Transfer In lines, click the Add Transfer In Line button and enter the new details in the Transfer In Line(s) box. Remember that the total Transfer In balance MUST match the Total Transfer Out balance.
- Note: The Add Transfer In Line button is disabled when the Account Transfer batch balances.
- Note: You cannot add additional Transfer In lines when a Client Account has been used in the transfer.

- Enter your additional Transfer In line and Save Changes
- The additional line is added to the schedule and your Account Transfer batch now balances.
