How to Create Receipt or Payment transactions
Please view the following video tutorial for a quick overview of entering and editing Receipts & Payments: Note the tutorial shows you how to enter additional transaction lines against the same Receipt/Payment batch – please also see this section for more information on multiple transaction lines:
Step by Step Instructions:
1. Navigate to Receipts & Payments List >
- Navigate to Receipts & Payments > Receipts & Payments List
- The Receipts & Payments List page displays a summary of all your receipts and payments (see Introducing Receipts & Payments)
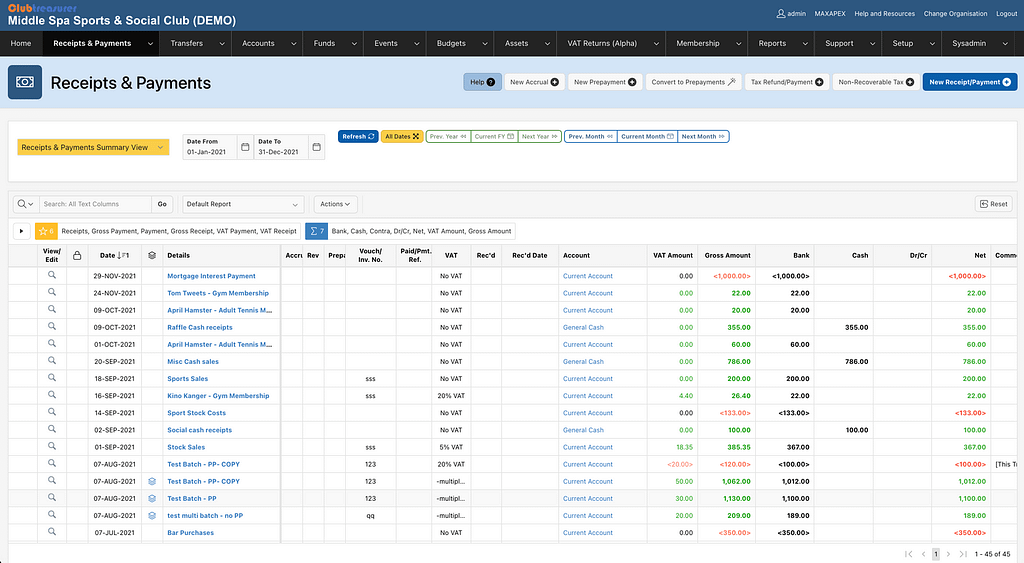
- Click the New Receipt/Payment button

- Opens the Receipt & Payment page

2. Enter Receipt/Payment Header Details
Important: The Receipt/Payment header details are shared by all Transaction Lines in a Receipt/Payment batch – see below

In the Receipt/Payment header region enter the following:
- Details (required)
- Enter the name of the payee/payer or description of the transactor from whom you have received or made the payment.
Clubtreasurer will try to autocomplete your entry as you type based on previous entries.
- Enter the name of the payee/payer or description of the transactor from whom you have received or made the payment.
- Date (required)
- Enter or select the date for this transaction using the calendar popup.
The form will enter today’s date by default.
- Enter or select the date for this transaction using the calendar popup.
- Account (required)
- Select the Account for the receipt/payment. Clubtreasurer will increase (or ‘credit’) the selected Account balance for receipt amounts, and decrease (‘debit’) for payments, once saved.
Premium users can add additional Accounts as required (See Accounts)
- Select the Account for the receipt/payment. Clubtreasurer will increase (or ‘credit’) the selected Account balance for receipt amounts, and decrease (‘debit’) for payments, once saved.
- Clubtreasurer also has 3 special Account types:
- “*DEBTORS” account types are used to record cash owed to your organisation, ie. not yet received. Note that in strict income and expenditure accounting, you only record ACTUAL cash receipts in your accounts; however, using the *DEBTORS account will let you record ALL receipt transactions for a particular event/project/activity and allow you to report your expected surpluses/deficits (profits/losses). Clubtreasurer will keep a running balance for *DEBTORS which you can enquire and report on.
- “*CREDITORS” account types are similar to Debtors but used for recording cash payments due by your organisation.
- “*CONTRA“. The *CONTRA account is used to offset receipts against payments for the same person or organisation. An example could be Mr.Clarke purchasing raffle tickets for the Sport’s Club Annual Dinner for £10. He also recently submitted £10 personal expenses claim incurred for helping to organise the Charity Fun Run. As Treasurer you could account for both of these transactions as separate receipts and payments out of your bank or cash accounts – but a more efficient method is to record both the raffle ticket receipt and the fun run expenses payment against the *CONTRA account. In this situation there is no physical receipt or payment of cash as the amounts offset each other. The golden rule for *CONTRA receipt transactions is that the balance must always be zero.
- Pay-In or Payment Type/No:
- For cash or cheques that you will be depositing into/paying from your bank/building society accounts, enter the Paying-In or Deposit Book number – you will use this later when reconciling your receipts with your bank statement.
- For other bank or building society direct receipts/payments, such as bank giro credits or interest received, select the appropriate QuickPick options: ‘BGC‘ or ‘INT‘
- For cash receipts/payments (eg. general, petty cash, floats, etc..), select the CASH QuickPick
- Voucher/Invoice No.:
- Enter the voucher or invoice number
3. Enter Receipt/Payment Transaction Line(s)
Now, enter the Transaction Line details in the Enter/Edit Transaction Line region:

- Cost Code (required)
- Select appropriate Receipt or Payment Cost Code
Cost Codes are used for financial reporting
- Select appropriate Receipt or Payment Cost Code
- Fund (required)
- Select appropriate Fund to record Transaction Lines against (Only “Open” Funds can be selected)
Clubtreasurer will default your General Fund
- Select appropriate Fund to record Transaction Lines against (Only “Open” Funds can be selected)
- Event (required)
- Select the Event to record receipt/payment against. (Only “Active” Events can be selected)
Clubtreasurer will default your General Administration Event
- Select the Event to record receipt/payment against. (Only “Active” Events can be selected)
- Sub-Event
- Select an appropriate Sub-Event if defined for the Event.
- Member (Optional Membership feature )
- Select a Member if you are using the Membership feature and want to record this transaction line against a Member (eg. Subscription receipt)
- Membership Billing Line (Optional Membership feature)
- Select the Membership Billing Line to record this transaction against.
- Amount (required):
- Enter a value for this Transaction Line.
- Important, in most cases you will always enter Receipts AND Payments as positive amounts (i.e. greater than zero). Clubtreasurer will correctly manage the accounting for both receipt and payment transactions for you.
Sometimes, however, you may need to enter negative amounts to record, for example, a ‘Sales refund’ or ‘Purchase credit’ which would create negative Receipt and Payment records, respectively.
- Note
- Enter notes or comments for this Transaction Line
4. Save your Receipt/Payment Transaction >
When you are ready to save your Transaction Line, click the “Save” button. Clubtreasurer will add this to the Batch Transactions Lines region at the bottom of the page.

Note that the first Transaction Line will be marked with the original icon: ![]()
5. Adding Additional Transaction Lines to a Receipt/Payment Batch
If required, you can add additional Transaction Lines to a Receipt/Payment record to create a Receipt/Payment batch. This is useful if you want to split out, say, a large cash receipt/payment for an organisation Event into separate lines, but record the overall Receipt/Payment as a single transaction for banking purposes.
To add additional Transaction Lines click the “Save and Add New” (or “Add New Line”) button in the Add/Edit Transaction Line region.
You can use the Comments box to record what each individual Transaction Line is for.
It is important to remember that all Transaction Lines entered in a Receipt/Payment batch will share the same Receipt/Payment Header (i.e. Details, Account, Date, Pay-in/Payment No. and Invoice No.)
Also, your Bank Reconciliation will show the total net value of the Receipt/Payment batch, not the individual lines.
If you need to create separate Header details for your transactions, simply create a new Receipt/Payment record by clicking the New Receipt/Payment button (top of the page).
Combining Receipt and Payment Lines in a Receipt/Payment Batch
You can also combine Receipt and Payment Transaction Lines in a Receipt/Payment batch. This can be useful, for instance, if you need to enter a receipt which also has transaction charges.
For example, you may use an online payment service for receiving membership fees from your members. The online payment service will deduct a transaction fee for each payment fee received. You will therefore need to record the member payment as two lines:
- Member’s payment (as a Receipt Transaction Line)
- Payment service transaction fee (as a Payment Transaction Line)
Clubtreasurer allows you to enter both of these Transaction Lines into a single Receipt/Payment record and show the overall net transaction value.
You create a new Receipt/Payment line by clicking the Add New Line button and entering your new transaction line details. (To help you, Clubtreasurer will copy the previous Event and Fund fields across which you can change if necessary). You can add any number of Transaction Lines.
Tip: If you know that you will be creating additional Transaction Lines, you can click the Save and Add New Button when saving. This will automatically create a new Transaction Line for you.
Every time you enter and save a new Transaction Line it will be added to the Saved Transaction Lines region. You can edit your lines by clicking the Edit icon.

Once you have finished adding and saving your Transaction Lines, review the Receipt/Payment totals region (top of screen) which shows the (Net) Total Amount value and No. Transaction Lines.

You now have the following options:
- Close button to take you back to the previous page.
- Note that you can also use the Tabs to navigate away from the page.
- Remember to save all your changes before navigating away from the page else you changes/entries will be lost.
- Delete button – Deletes the entire Receipt/Payment, including all Transaction Lines and returns you to the Receipts & Payment List page.
- New Receipt/Payment button – opens a new page to allow you to create a new Receipt/Payment
- Copy button – this feature allows you to create a duplicate copy of an existing Receipt/Payment including all Transaction Lines. This is useful if you have regular or repeating transactions and means you no longer have to enter all the details each time.
- Reverse button – this allows you to quickly create a reverse copy of an existing Receipt/Payment including all Transaction Lines. The reversed transaction will mirror the original expect the value(s) will be reversed. This is useful if you want to create a reversing entry for an accrual (see Accruals & Prepayments) or as an alternative way to delete a transaction whilst keeping an audit trail of the transactions.
How to Copy a Receipt/Payment
- Navigate to Receipts & Payments tab
- Open the Receipt/Payment you want to copy (click View icon or Details link)
- Click the Copy button
- A new duplicate Receipt/Payment record will be created and displayed (Note this will be dated at today’s date and will be Unreconciled. You can change the date and any other details as required)
- Age-Locked or Reconciled Receipts/Payments can be copied. The new duplicate record will be unlocked and editable.
- You cannot copy Receipts/Payments where:
- The transaction is included in an Account Transfer
- Account is no longer ‘Active’
- One or more lines are recorded using a ‘Closed’ Fund
- One or more lines are recorded using a ‘Closed’ Event
How to Reverse a Receipt/Payment Transaction
- Navigate to Receipts & Payments tab
- Open the Receipt/Payment you want to copy (click View icon or Details link)
- Click the Reverse button
- This will create and display a new Receipt/Payment record (including all Transaction lines) which reverses the value(s) of the original transaction. The following changes will be made:
- “– Reversed” text will be appended to the original Details text
- The transaction will be created with today’s date
- Reversed Receipt/Payments allow limited editing in order to maintain your accounting integrity. You can only change the follow items:
- Date
- Account
- Comments
- Age-Locked Receipts/Payments can be reversed.
- You cannot reverse Receipts & Payments transactions where:
- The transaction is Reconciled
- The transaction is included in an Account Transfer
- Account is no longer ‘Active’
- One or more lines are recorded using a ‘Closed’ Fund
- One or more lines are recorded using a ‘Closed’ Event