The Transaction Import feature allows you to quickly generate multiple Receipt, Payment and Transfer records by uploading statements from your bank or online payment systems.
This feature can significantly reduce manual entry and administrative overhead, and we highly recommend that all users become familiar with the import process.
The import process has three steps:
- Load your source data – upload or paste your statement
- Create Draft Transactions – apply default values and automated matching
- Review & Edit Draft Transactions – check everything, correct, then finalise
On this page
- Standard and Advanced Transaction Import
- Step 1: Load Source Data — mapping your source columns
- Step 2: Create Draft Transactions — Cost Code & Member matching
- Step 3: Review & Edit Draft Transactions — Actions menu, splitting rows, amounts and VAT, finalising
- Importing from Online Payment Systems
Standard and Advanced Transaction Import
The Transaction Import feature comes in two versions:
➡️ Standard Transaction Import
The Standard Transaction Import allows you to easily upload transactions from bank statements or online payment systems, creating multiple Receipt and Payment entries in one streamlined process. This highly automated feature is suitable for most organisations, and we recommend that new users begin with the Standard version.
➡️ Advanced Transaction Import
In certain cases the Advanced Transaction Import process may be more appropriate. It provides additional options and, significantly, allows you to manually map your source data columns to specific Clubtreasurer fields rather than relying on the automatic mapping algorithm.
The Advanced option is recommended when:
- The Standard Import is unable to accurately identify and match your source data columns
- The first row of your source data does not contain column headings
- You are importing online payment data that requires the import to create separate Receipt/Payment batches with distinct gross amount and fee amount transactions
🔴 Step 1: Load Source Data
Before you begin, download your transactions from your bank or financial institution and save the file in *.csv format (UTF-8). Please contact your bank if you need help with this step.
Go to Receipts & Payments > Import Transactions. You can either upload your file or copy and paste your data directly.
Your source data must include these mandatory columns:
- Date
- Details
- Amount — either a single Amount column, or separate Paid In and Paid Out columns
Some banks show the Paid Out column as negative values; these are handled correctly during the import.
Note: If your source data has more than one amount column per row — as online payment exports usually do — the Standard Import will only use the Net or Total column. See Importing from Online Payment Systems for how to handle these files.
Mapping your source columns
When you load your data, the import process matches your source columns to the Clubtreasurer fields used to create Receipt and Payment transactions.
The Standard Import does this automatically, using a library of keywords. If one of your columns is headed “Description”, for example, the algorithm associates it with the Receipt/Payment Details field.
Click to see the Source Data Keyword & Mapping Guide used by the Standard Transaction Import
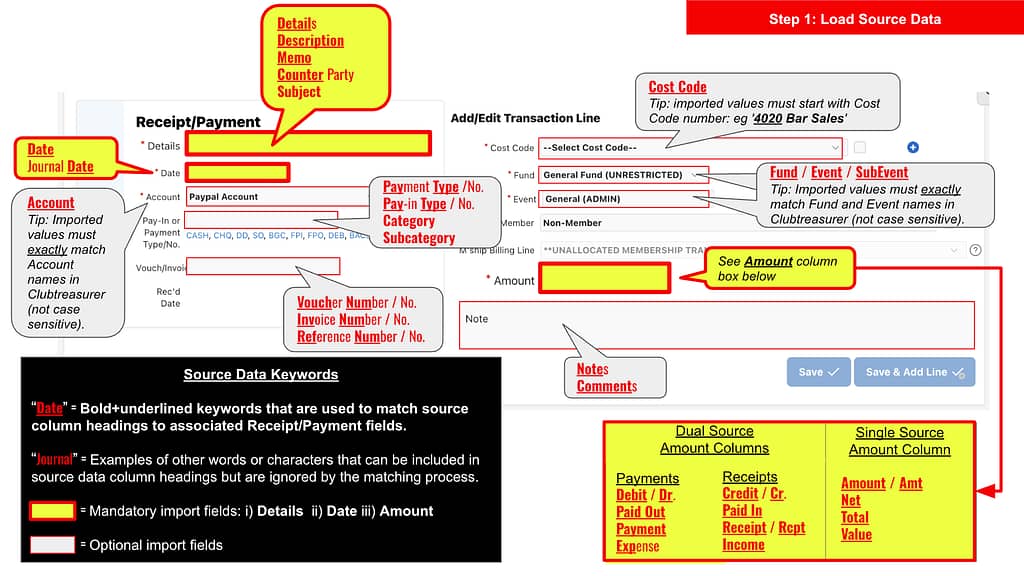
The Advanced Import lets you map each column manually by selecting the appropriate Target column.
When you import your data using the Advanced Transaction Import method you will need to manually ‘map’ the source columns to the “Target” columns to tell Clubtreasurer how to handle the data. In some cases, the import process will automatically map the columns where it finds a name match, otherwise you will need to manually select the appropriate value from the Target column.
The minimum mandatory Target columns required to import your data are:
Date | Details | Amount*
*Amount can have single or dual columns
| DATE | DETAILS | AMOUNT |
|---|---|---|
| 10-JAN-2024 | John Smith Membership Income | 25.00 |
| 11-JAN-2024 | Building Maintenance Costs | -1050.00 |
| DATE | DETAILS | PAID OUT | PAID IN |
|---|---|---|---|
| 10-JAN-2024 | John Smith Membership Income | 25.00 | |
| 11-JAN-2024 | Building Maintenance Costs | 1050.00 |
Click to see the full list of columns used by the Advanced Transaction Import
| Target Column | Column Description |
|---|---|
| Date* | Map this column to your bank statement’s Date column *Required |
| Details* | You can also use the alternative DESCRIPTION or MEMO mapping columns but you must only use one of these in your import. *Required |
| Amount* or Paid-in / Credit Amt* Paid-out / Debit Amt* | ➡ Used where the statement has a single Amount column *Required ➡ Used where the statement has separate Dr/Cr Amount columns. (You must map both columns if using this option). *Required |
| Paid/Pmt Ref | Paid-in/Payment Reference Details |
| Vouch/Inv. No. | Voucher or Invoice Number |
| Comments | Comments |
| Cost Code | You can import Receipt & Payment Cost Codes in your source data if required. Imported Cost Codes MUST start with their 4-digit codes (e.g. “4002 Membership Income“) which the import process will use to match to the correct Cost Code. If no match is found it will return the Default Cost Codes in the Import Transactions page (or be overwritten by the Cost Code Matching, if selected). |
| Events & Sub-Events | You can import Events & Sub-Events during the import process. Imported Event names must exactly match the existing Events/Sub-Events already setup in Clubtreasurer, otherwise the import will fail for that line. (Not case-sensitive) You can leave the Event field blank for row(s) that you do not want to define an Event. In this case, the system will use the Default Event during the Import Transactions process. |
| Funds | You can import Funds during the import process. Imported Funds names must exactly match the existing Funds already setup in Clubtreasurer, otherwise the import will fail for that line. (Not case-sensitive) You can leave the Fund field blank for row(s) that you do not want to define an Fund. In this case, the system will use the Default Fund during the Import Transactions process. |
| Accounts | In most cases your import batch will be for a specific Account which you select in the create Draft Rows page. However, it is possible to import different Accounts for each row if you have mixed import batches.. Imported Account names must exactly match the existing Accounts already setup in Clubtreasurer, otherwise the import will fail for that line. (Not case-sensitive) You can leave the Account field blank for row(s) that you do not want to define an Account. In this case, the system will use the Default Account during the Import Transactions process. |
| Members | You can import Members during the import process using the Members’ Reference ID (“REF ID“). Importantly. your mapped source data column must contain the REF ID as the first characters in the entry which can be followed by a space + the member name (or any data) for your own reference: Valid Entries (REFID + Name) ✔️ “1234” ✔️ “1234 Joe Bloggs” Invalid Entries: ❌ “Joe Bloggs 1234” (REF ID must be first chars) ❌ “1234JoeBloggs” (Missing space between REF ID and space) When you create your Draft Rows: The import process will attempt to match the REF ID to Active members (matches to Archived/Inactive members will return a blank entry). Do not check the Apply Member and Membership Matching box when you are importing the members. (If you do, the process will ignore the imported Member rows but will still try to match the missing member rows, if any) If you have set up Accounting Rules for Member Sections, these will also be applied for your imported members. |
🔵 Step 2: Create Draft Transactions
In this step you add the accounting details that your bank statement does not contain, so that Clubtreasurer can create Receipt, Payment and Transfer records.
First, check that Loaded Rows shows the number of rows you expected, and that there are no Failed Rows. Errors here are usually caused by column mapping — check that your source data has all the mandatory columns, and that no two column headings map to the same Clubtreasurer field.
Next, choose the default values to apply to every imported row. You can change any of these on individual rows afterwards.
- Upload to Account — the Account all rows will be added to
- Reconciled — tick to import rows as already reconciled, with a reconciliation date
- Event and Fund — the defaults applied to each row where not imported
- Receipt and Payment Cost Codes — the defaults used where no Cost Code is imported or matched
- Transfer Cost Codes and Account — used if you convert any rows to Account Transfers
The import assumes that zero and positive amounts are Receipts, and negative amounts are Payments.
Then click the Create / Refresh Draft Transactions button
Note: You can click Create / Refresh… at any time, but doing so overwrites any changes you have made to individual rows and restores any rows you have converted or deleted.
Cost Code & Member Matching Options
As well as the default values, you can ask the import to match Cost Codes and Members automatically, which can dramatically speed up the process.

➡ Cost Code Matching
When the “Apply Cost Code Matching?” option is selected and you click the “Create/Refresh Draft Import Rows…..” button, the import process will attempt to automatically assign Cost Codes to the imported rows based on matching row descriptions to existing historic transactions. Rows that cannot be matched will use the default Cost Codes.
You can change all Cost Codes as before by editing rows in the Draft Transactions table.
👉 The matching algorithm is an approximation and may not always provide an accurate match in all cases. You should always review your imported rows and manually change incorrectly matched Cost Codes in the Draft Transactions table.
➡ Member & Membership Matching
Organisations using the Membership Management application will see “Member” and “M’ship Billing Line” columns in the Draft Transactions table.
When the Apply Member & Membership Matching option is selected, the Import process will try to match Members to your imported rows based on the source data Details column.
The matching algorithm attempts to match Members and Membership Billing Lines in the following order:
Matching Process #1
Billing Line / Invoice No.
Returns Member and Billing Line/Invoice when the import process matches an existing unpaid Billing Line in the imported Details column. This is the most accurate method and we recommend asking your members to add the Billing Line/Invoice No. to their payment references. (Your members can see the Invoice No. on their invoices and/or statements)
This is the only matching process that returns the Member AND Billing Line/Invoice and is therefore the recommend process.
eg. Source Details: “Burt Bison ref123456” would match to Billing line/Invoice 123456 and return both the Member and Billing Line.
Matching Process #2
Transaction Import Reference
If no match is found in Step 1. then the import process will try to return the correct Member record by finding an exact match within the imported Details column and the Transaction Import Reference value stored against the member record.
The Transaction Import Reference is a unique ID that can be used to identify a specific member when included in the source data Details columns.
Examples include:
– Direct Debit/Faster Payments Mandate
– External Payment system reference
– Alternative member names
You can store up to 3 x Transaction Import References per member.
eg. Source Details: “Bison DD009998877” would match to member Burt Bison if he has “DD009998877” Transaction Import Reference stored in his member record.
Matching Process #3
Member Name Matching
The final matching process is used if #1 and #2 are not successful. It uses a ‘fuzzy logic’ process to find the nearest matching member name based on the Details column.
eg. Source Details: “B.Bison” would match to member Burt Bison*
*CAVEAT: The matching algorithm is an approximation and may not provide an accurate match in all cases. It is very sensitive to the quality and/or completeness of the source data – eg. the example above might also return “Bessie Bison” or “Bill Bison” as other close matches. You should always review your imported rows and manually change or remove incorrectly matched Members and Billing Lines in the Draft Transactions table.
Matching Billing Lines / Invoices
When Members are matched by Processes #2 and #3, the process will also try to select the oldest unpaid Billing Line/Invoice that matches the imported line amount, otherwise it will return “Unallocated Membership Transaction” or “Non-Membership Transaction” (based on an import process option). You can then manually update this in the Draft Transactions table and select the correct Billing Line / Invoice.
For more details on importing Membership payments and Transaction Import Reference please see Managing Billing & Payments – Importing Membership Payments #4 tutorial for more details.
🟢 Step 3: Review & Edit Draft Transactions
Your Draft Transactions are now created, but nothing has been added to your accounts yet. This is your opportunity to check the data and correct anything before the transactions go live.
It is worth reviewing every import, particularly the columns that were defaulted or matched automatically — Cost Codes, Events, Funds and Members.
Row status and colours
Each row carries a status icon. Hover over it for an explanation of the status, including what to do about it.

Rows are colour-coded too. A red cell marks a missing required value — usually the Account or Cost Code — so you can see exactly which field needs attention. Confirmed and edited rows are highlighted, transfers and batch additions have their own shades, and prior-year and duplicate rows are greyed to show they will not be imported.
Editing Values
You can change any imported value, add data that was not in your source file, and add, delete or split rows. There are three ways to do it:
- Directly in the table — double-click a field, choose or type a new value, then click Save Changes
- Actions menu — click the gear icon at the start of any row
- Edit Transaction form — a pop-up showing the whole row on one page
Editing a row automatically marks it as confirmed.
Actions Menu
| Action | What it does |
|---|---|
| Edit Transaction… | Opens the row as a single page for review and editing. |
| Confirm Transaction Details | Marks a row as reviewed where the details are already correct. |
| Undo Confirm | Removes the confirmed status. |
| Split Row… | Divides the row into two or more transactions. |
| Convert to Transfer | Creates an Account Transfer pair from the row. |
| Restore Transfer to R/P | Converts a Transfer pair back to a single Receipt/Payment. |
| Clear Duplicate status | Overrides a duplicate warning so the row is imported. |
| Force as new Receipt/Payment | Stops the row joining an existing batch; creates a separate transaction instead. |
| Delete row | Removes the row from the import. |
The menu only shows the options that apply to the row you clicked. Save any changes made in the table first — these actions work on saved data, so the gear icon is unavailable while there are unsaved edits.
Tip: Clear Duplicate status, Force as new Receipt/Payment and Delete are also available as toolbar buttons that work on several rows at once. Use the selector column to tick individual rows, or the header box to select them all.
Reviewing rows one at a time
Choosing Edit Transaction… opens the row in a pop-up showing every value on a single page, rather than scrolling sideways through the table. Click any value to change it.
Saving confirms the row and opens the next unconfirmed row automatically, with a message telling you what was saved. The table updates behind the dialogue, so you can see your progress as you work. Continue until the last row, at which point the window closes — or close it at any time to return to the table.

Tip: You do not need to confirm every row to complete an import. Confirming is simply a checklist to help you keep track when working through a large batch.
Splitting a row
Where one imported row needs to be recorded under two or more different Cost Codes — or against different Events, Funds or Members — use Split Row… from the Actions menu.
- The dialogue opens showing the original pre-split amount.
- Enter a split amount and press Enter. You cannot split more than the original amount.
- A summary shows what has been allocated and what remains on the original row.
- Add further split lines if required.
- Click to save the splits.

The table then shows the split rows alongside the original. Each new row is added to the same Receipt/Payment batch as the original — shown by the batch icon — so they stay together in your accounts. You can now edit the Cost Code, or any other value, to differentiate the accounting treatment of each line.
Converting a row to an Account Transfer
Where an imported row is actually money moving between two of your own accounts, choose Convert to Transfer. Clubtreasurer creates a second row for the opposite side of the pair and highlights both so they are easy to spot.
The Transfer Cost Codes and the receiving or sending Account are taken from the default values you set in Step 2. If no defaults were set, you will need to select these manually on the new rows.
Selecting Restore Transfer to R/P on either row of a pair converts it back to a single Receipt/Payment.
Amounts and VAT
💷 If your organisation has VAT Accounting enabled: the Receipt and Payment Amount columns are always treated as Gross amounts including VAT throughout the import process — the figure as it appears on your bank statement.
The Net and VAT amounts are calculated during the Finalise process, based on the VAT Type of each row.
VAT Type is derived from the row’s selected Cost Code, so changing a row’s Cost Code updates its VAT treatment. You can also set VAT Type directly on a row, as with any other column.
The same applies when you split a row: enter the gross amount for each split line, and the Net and VAT figures follow from the Cost Code assigned to that line.
Note: a Transfer between your own accounts is not a supply, so it cannot carry VAT. If you need to convert a row that has a VAT Type applied, set its VAT Type to “No VAT” first.
Delete Row
Click Delete Row to delete the current row.
Tip: Deleting Split Rows:
👉 When you delete a Split Row its amount is added back to the original ‘parent’ row.
👉 You cannot delete an original ‘parent’ row whilst it has ‘child’ Split Rows – you must delete the child rows first.
Finalising the import
When you have finished reviewing, click Finalise & Create… to add your Draft Transactions into your accounts as live Receipt, Payment and Transfer records.
The final screen lists every transaction line created and assigns an Import Batch ID. You can use this later to find the entries, view or edit individual lines, or delete the whole batch.
Tip: Deal with any red cells before finalising — those are rows with a missing Account or Cost Code, and the import will prompt you about them.
Importing Data from Online Payment Systems
Learn how to import transactions from platforms like PayPal, Stripe, GoCardless, and SumUp.
The Challenge with Payment System Exports
Unlike standard bank statements, online payment systems typically provide multiple amount columns for a single transaction. A single row in your export file might contain:
- Gross Amount: The total paid by the customer.
- Fee: The processing or transaction fee.
- Net Amount: The final amount deposited into your account.
To maintain accurate records in Clubtreasurer, these should be imported as separate transaction lines so you can track both your income and your processing costs.
The Solution: Multi-Pass Importing
The most efficient way to handle these files is to run the import process twice using the same source file, mapping a different amount column each time.
- Pass 1: Map the Gross Amount to record your total income.
- Pass 2: Map the Fee column to record your expenditure.
👉 The import process will match the pairs of transactions and create a single Receipt & Payment containing separate transaction lines for the Gross Amount (receipt) and Fee (payment) amounts.
Video Tutorial: Step-by-Step Guide
Watch the video below to see how to use the import tool to split these amounts accurately and quickly.
You must use the Advanced Transaction Import for this process.
When mapping source columns we now recommend also mapping your TRANSACTION_ID (or equivalent) to Vouch/Inv No. column in Clubtreasurer. The TRANSACTION_ID is a unique reference number for each imported line and will ensure the imported transactions are accurately matched together. (Note this is highlighted in the video tutorial but is not demonstrated.)